
Cavity trays – roll damp course material
When using roll damp course (dpc) material, the profile must rise a minimum of 150mm within the cavity and should be constructed to prevent the build-up of water within a cavity wall and allow any water to escape through the outer leaf. The tray should be positioned immediately above the opening and not several courses above.
Trays formed in this way, using roll dpc material, must have stop ends formed by folding the ends into the “perp joint” of the outer leaf and creating a stop end of at least 75mm high. The stop end must be located to coincide with the nearest drainage perpend.
The top part of the tray should be built into the inner leaf to provide support for the tray. The bottom of the tray should be taken across the external leaf and preferably just visible at the external mortar joint. The cavity tray should extend a minimum of 25mm beyond the vertical cavity closer forming the reveal and cover the lintel ends.
The roll damp course material should be wide enough to meet the above requirements and preferably be in a continuous length across the opening to avoid joints in the tray.
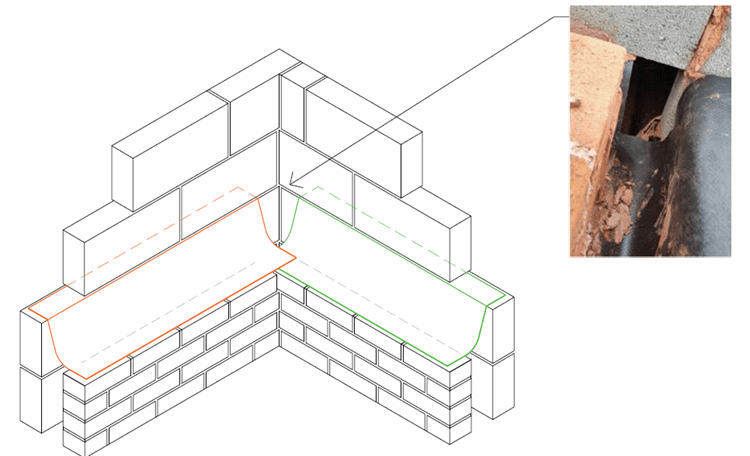
Cavity Trays in corners and critical locations
Where the risk of water ingress is particularly high, in corners for example, the cavity tray detailing is more complex and requires a high level of workmanship to be effective. In such cases, it is recommended that in low-rise cavity masonry walls (buildings less than 18m in height) a proprietary preformed cavity tray system is used.
The image below demonstrates why. An attempt to form a cavity tray using a flexible type dpc around a corner shows a clear passage for moisture ingress to the cavity below. This is a common corner detail that, because of the complexity involved, is often installed incorrectly.

To reduce the risk of water ingress, a proprietary (preformed) cavity tray system should be used for all stepped abutments or lower storey abutments and – as highlighted here – where cavity trays continue around corners. This advice is echoed in BS8215 Design and installation of damp proof course in masonry construction, section 6.7.
Preformed cavity trays still require correct positioning to be effective. In flat roof abutments it is important that the bed joint is raked out to allow the installation of flashing, as this article explains.
Preformed cavity trays
Preformed cavity trays can either be built into the inner leaf, or alternatively terminate against it and are therefore equally suitable for both timber frame and masonry construction. Preformed cavity trays can be used on all stepped roof abutments, stop ends must be used.
Whichever cavity tray construction is used, weepholes are required. At least two weepholes must be provided to cavity trays above openings and pre-formed “weeps” should always be used at maximum 900mm centres and always be positioned at stop ends.
Cavity tray best practice
- Cavity trays should be installed over all external door and window openings including bay windows and at roof abutments, both horizontal and pitched
- The cavity tray should be correctly located directly over the window/door head
- Purpose-made stepped cavity trays are best utilised for all pitched roof abutments
- Where natural stone/artificial stone heads are being used. It is advisable to double up the cavity trays, one below and one above the head and ensure that the cavity insulation continues to cover behind the stone head
- Ensure weep holes are provided at each end of a horizontal cavity tray and at maximum 900mm centres
- Ensure a weep hole is provided at the base of stepped cavity trays
- Ensure the cavity trays are kept free of mortar droppings
We have created a handy checklist that explains where to position your cavity trays and when to add weep holes below, which you can download here.
You can also read our blog on weep holes in rendered walls.
- Learn more about the correct use of cavity trays and stop ends in Chapter 7.1 of our technical manual.