
External Landing and Drainage
Objective: Ensure external landing is large and level enough for easy access for wheelchair users and ambulant people, whilst avoiding standing water and limiting the amount of surface water reaching the threshold.
 Process
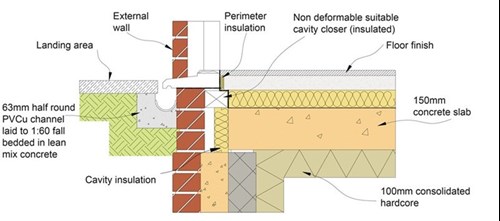
- Install an external landing with a fall ratio of between 1:40 and 1:60.
- Ensure water falls away from the doorway in a single direction and make sure there are no cross falls.
- Build a drainage channel between the landing and the threshold.
- Ensure the channel discharges to a drainage system or permeable field drain.
Extreme conditions
- If the threshold is likely to be subject to extreme weather conditions further drainage should be provided.
- Install the drainage channel at the junction of the ramp and landing to avoid ponding and any storm water reaching the threshold.
Low-lying/steep slopes
- Install additional drainage to adjoining land to prevent drainage channels flooding.
- Construct the drainage channel as a site formed slot above a discharge channel or by a proprietary drainage channel.
- Ensure drainage slots are no wider than 18mm.
You may also want to consider additional measures such as a canopy roof to shelter users from the rain.
Threshold sill and its intersection
Objective
Allow access for wheelchair users and ambulant people whilst minimising the risk of surface water entering the dwelling.
Process
- Drainage channels in front of a threshold sill should have a level surface between the channel and the sill.
- If the threshold is exposed to wind driven rain the landing can be up to 10mm below the level of the sill. (NB the edge of the sill in this case needs to be rounded or chamfered).
- Install threshold sills with a maximum slope of 15 degrees and a minimum of 7 degrees to discourage water ingress and facilitate water run-off.
- Maximum height of the leading edge of the door threshold is 15mm. Where it exceeds 5mm the edge should be rounded or chamfered.
- Create a drained and ventilated void in front of any timber sills or associated components.
- Ensure floor insulation is installed around concrete slabs and timber floors and this is flush with any wall insulation.
- Remember to provide sufficient space at the entrance with an ideal width of 900mm. If this is not possible it should be a minimum width of 800mm.
Intersection between threshold and internal floor
Objective
Ensure easy transfer for wheelchair users and ambulant people whilst enabling occupants to choose a range of floor types and thicknesses.

Process
- Ensure the threshold is level with the internal floor to allow easy access.
- If the drop is less than 15mm below the threshold (or 10mm for soft pile carpets) no internal transition is required.
- If the drop is greater than 15mm install a graded transition with a maximum slope of 15 degrees and use a slip resistant surface.
Ensure sufficient space in lobby areas for wheelchair users to turn around and allow unobstructed entry for disabled users.
Download our Level Threshold Checklist to help ensure you comply with the requirements of building regulations and our Technical Manual.